Steps for install AsterCRM and integrate it with external CRM
1) Download and unzip the source (assuming your WEB root is /var/www/html)
Get the software from
[bash]
[/bash]
[bash]
cd /var/www/html
unzip astercc-X.X.zip
mv astercc-X.X astercc
/var/www/html/astercc/astercrm # main directory and PHP scripts of astercrm
/var/www/html/astercc/asterbilling # main directory and PHP scripts of asterbilling
/var/www/html/astercc/sql # sql to create database tables
/var/www/html/astercc/script # astercc daemon and some other script files
/var/www/html/astercc/index.html #guide page
/var/www/html/astercc/astercc_full_logo.png #logo
[/bash]
2) It is highly advised that the whole script directory be moved to a more secure location like /opt and out of the WEB root directory
[bash]
mkdir -p /opt/asterisk/scripts/astercc
mv /var/www/html/astercc/scripts/* /opt/asterisk/scripts/astercc
chmod +x /opt/asterisk/scripts/astercc/*
[/bash]
3) Create the MySQL database and tables, asterCRM need mysql 4.1 or above
Note: here we create the database named astercc, it both used for astercrm and asterbilling, you could use whatever db name you want use your configration to replace “yourmysqluser” and “yourmysqlpasswd”
[bash]
mysqladmin -uyourmysqluser -pyourmysqlpasswd create astercc
mysql -uyourmysqluser -pyourmysqlpasswd astercc < /var/www/html/astercc/sql/astercc.sql
[/bash]
4) Update /etc/asterisk/manager.conf to enable Manager connections
Note:allow asterisk on different server .Add something like this to the manager.conf file:
[bash]
[general]
enabled = yes
port = 5038
bindaddr = 0.0.0.0
;displayconnects = yes
;the following line could be changed by yourself
[astercc]
secret = astercc
read = system,call,log,verbose,command,agent,user
write = system,call,log,verbose,command,agent,user
deny=0.0.0.0/0.0.0.0
; if you want to run astercc on another server
; use your astercc ip to replace 127.0.0.1 or add a new line
permit=127.0.0.1/255.255.255.0
[/bash]
5) Modify config file
for asterCRM:
modity /var/www/html/astercc/astercrm/astercrm.conf.php to fit your configration
for asterCC:
modity /var/www/html/astercc/asterbilling/asterbilling.conf.php to fit your configration
6) Start Asterisk and daemon
There are two daemon modes you can choose, astercc mode or eventsdaemon(can be used for astercrm only) mode.
A) For astercc mode(can be used for both astercrm and asterbilling.
try start astercc:
modify /opt/asterisk/scripts/astercc/astercc.conf to fit your configuration mainly database setting and AMI setting.
run astercc for test
[bash]
/opt/asterisk/scripts/astercc/astercc
[/bash]
if you could read like following line:
[bash]
“Connecting to mysql database on 127.0.0.1:
Database connection successful.
Connecting to asterisk on 127.0.0.1 port 5038:
Asterisk socket connection successful.
Check asterisk username & secret:
Success
Monitor Start:
…(some log message)…”
congratulations, your astercc works well, use ‘ctrl + c’ to exit
or else, please check your database/AMI configration in astercc.conf
[/bash]
Start up astercc (default settings):
modify /var/www/html/astercrm/astercrm.conf.php set eventtype to curcdr
[bash]
/opt/asterisk/scripts/astercc/astercc -d
[/bash]
Start up astercc daemons when system startup:
Note: This option can only fit to redhat-release system. If you want astercc daemons to start automatically when you boot your machine, you need to :
[bash]
cp /opt/asterisk/scripts/astercc/asterccd /etc/rc.d/init.d
chmod 755 /etc/rc.d/init.d/asterccd
chkconfig –add asterccd
[/bash]
Advice: Configure your astercc restart once everyday, it’s not necessary, but it ‘s good for your astercc operation for install AsterCRM and integrate . for example: you want to restart astercc at 0’clock everyday, just do the following line as root.
[bash]
crontab -e
add a new line:
0 0 * * * /etc/rc.d/init.d/asterccd restart
the first “0” figures minutes and the second “0” figures hours.
[/bash]
B) For eventsdaemon mode(can be used for astercrm only) try start eventsdaemon:
modify eventsdaemon.pl to fit your configuration mainly database setting and AMI setting.
[bash]
/opt/asterisk/scripts/astercc/eventsdaemon.pl
if you could read:
“Message: Authentication accepted”
congratulations, your eventsdaemon works well
use ctrl + c to exit
or else, please check your database/AMI configration in eventsdaemon.pl
[/bash]
Start eventsdaemon (default settings):
modify astercrm.conf set eventtype to event
[bash]
/opt/asterisk/scripts/astercc/eventsdaemon.pl -d
[/bash]
At some point it may be desirable to delete unwanted events from the database table. The eventsdaemon is also designed for this. please check eventsdaemon.pl for parameter “log_life” .also we provide a “watch dog”, it would help you restart eventsdaemon when it shutdown add this shell to your start-up file, for example:
[bash]
echo /opt/asterisk/scripts/astercc/eventdog.sh >> /etc/rc.d/rc.local
[/bash]
so that everytime your server start, eventsdaemon would be loaded
7) Set file & folder access for astercrm
[bash]
chmod 777 /var/www/html/astercc/astercrm/upload
chmod 777 /var/www/html/astercc/astercrm/astercrm.conf.php
[/bash]
If asterisk and astercrm running in one server, you could make a soft link to astercrm web directory for listening monitor records online.
ln -s /var/spool/asterisk/monitor/ /var/www/html/astercc/astercrm/monitor
note: astercrm support listen monitors online only can be wav format file.
8 ) Web browsing
For astercc:
[bash]
http://localhost/astercc
or http://YOUR-WEB-SERVER-ADDRESS/astercc
[/bash]
For astercrm:
[bash]
http://localhost/astercc/astercrm
or http://YOUR-WEB-SERVER-ADDRESS/astercc/astercrm
[/bash]
login with admin/admin
Integration of External CRM With AsterCRM
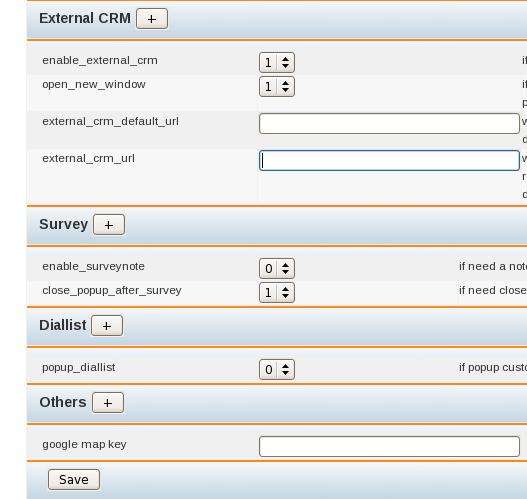
In your astercrm, go to
Manager-> preference
If asterCRM use external CRM software install AsterCRM and integrate , change the value of enable_external_crm to 1. When using external CRM, the default page to be displayed is specified in external_crm_default_url .Value of external_crm_url specifies, when asterCRM need to pop up, which url would recevie the event, %callerid: %calleeid: %method dialout or dialin. Save the changes made by clicking Save button.


