When you have your application’s database hosted on your server, you normally install phpmyadmin on the server and access it via the browser to perform administration tasks such as running queries, adding user accounts, creating new databases, etc.
But what will you do when you are asked to move the database to a distributed database service like Amazon RDS? Nothing to worry about; phpmyadmin can be configured to access RDS databases by tweaking the configuration file. Creating and configuring RDS on AWS is a different topic and is not discussed here.
If you are running on Ubuntu 20 or 22, simply edit the file /etc/phpmyadmin/config.inc.php and locate the below-mentioned code.
/** * phpMyAdmin configuration storage settings. */ Above that, insert the details of the RDS server. A typical entry would look like this:
$cfg['Servers'][$i]['host'] = 'xxxxxxxxxxxxxxxxxxx-west-2.rds.amazonaws.com'; $cfg['Servers'][$i]['port'] = '3306'; $cfg['Servers'][$i]['verbose'] = 'RDS HOST'; $cfg['Servers'][$i]['connect_type'] = 'tcp'; $cfg['Servers'][$i]['extension'] = 'mysql'; $cfg['Servers'][$i]['compress'] = TRUE;
xxxxxxxxxxxxxxxxxxx-west-2.rds.amazonaws.com is the RDS server name.
Now, you may simply access your phpmyadmin login page and enter the RDS credentials to access the database.
In most cases, you might not have moved all the databases from the server to RDS. So you would still need to access those databases via the phpmyadmin interface. How will you manage that?
Do you need another PHPMyAdmin installation? Fortunately, the answer is no. PHPMyAdmin allows you to select the host before attempting to make the connection.
How do I enable multi-host selection?
Simply edit the same conf file, config.inc.php, and under the details of the RDS server we recently added, insert the details of the extra host you want to add. But note that you have to increment the value of the variable $i by one. i.e $i++. Each server is added as an array element, and we increment the array index before storing the host details. So you will be adding the below text to your conf under the previous block.
$i++; $cfg['Servers'][$i]['host'] = 'localhost'; $cfg['Servers'][$i]['port'] = '3306'; $cfg['Servers'][$i]['verbose'] = 'LOCALHOST'; $cfg['Servers'][$i]['connect_type'] = 'tcp'; $cfg['Servers'][$i]['extension'] ='mysql'; $cfg['Servers'][$i]['compress'] = TRUE;
Note: Don’t forget the $i++.
This will enable the “Server Choice” dropdown option on the login page of phpmyadmin. It will display the options set in the’verbose’ variable of the server sections.
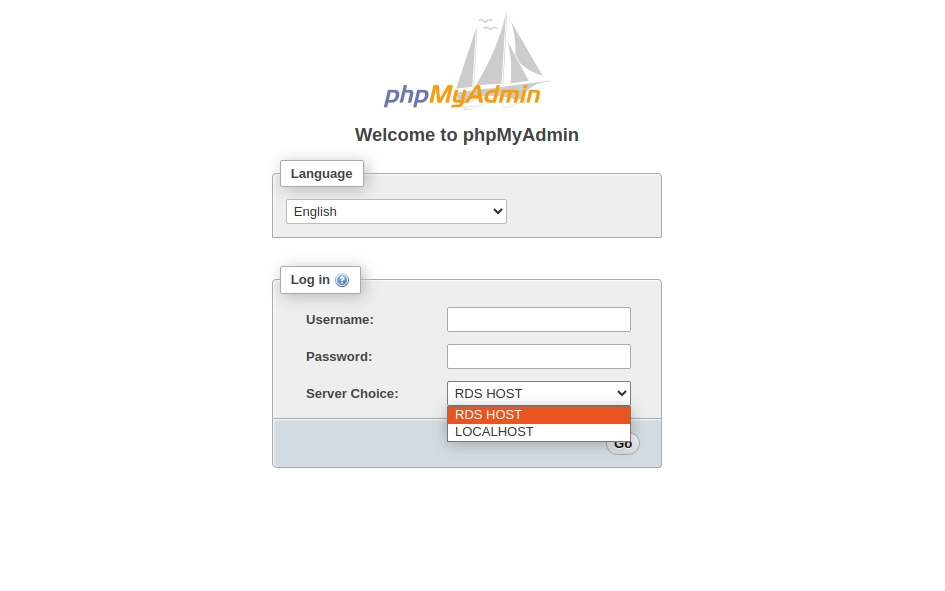
In our example, the dropdown will show two “Server Choice” options: RDS and Localhost.
You may extend this logic to add as many hosts as you want.