Amanda Backup System Utility
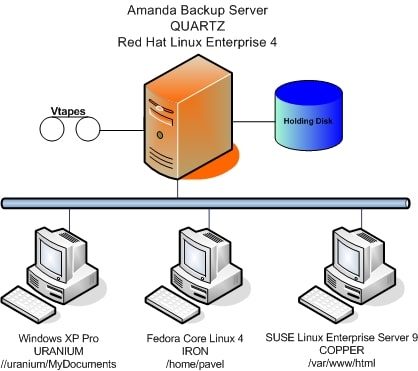
AMANDA is an opensource backup utility it allows to set up a single master backup server to back up multiple hosts over network to tape drives/changers or disks or optical media.Amanda Backup System protects more than a million servers and desktops running various versions of Linux, UNIX, BSD, Mac OS-X and Microsoft Windows operating systems worldwide.
Here I’m going to do how to configure, setup and restore amanda backup utility in RHEL/centos 6.x
A. Configuring Amanda Server
1. Installing Amanda
Download latest version of amanda server package, installing the package also creates a user named Amanda Backup System who belongs to the group disk.
The amanda service started by extended internet daemon, make sure that the xinetd package installed on every amanda server and client.
wget http://www.zmanda.com/downloads/community/Amanda/3.3.3/Redhat_Enterprise_6.0/amanda-backup_server-3.3.3-1.rhel6.x86_64.rpm
Check intallation errors in /var/log/amanda/install.err and for installation log in /var/log/amanda/install.log.
Enable amanda service in xinetd:
#vim /etc/xinetd.d/amandaserver
disable = nochkconfig xinetd on
service xinetd restart
Make sure the service is running or not
netstat -a | grep amanda
udp 0 0 *:amanda *:*
2. Configuration file
The default path of Amanda Backup System config is in /etc/amanda/
Here I’m going to create a folder totalbackup directory under /etc/amanda
As the amandabackup user, create the Amanda configuration directory
su amandabackup
mkdir /etc/amanda/totalbackup
Create core config file — amanda.conf
vim /etc/amanda/totalbackup/amanda.conf
#To specify your organization and to your tape configuration
org “totalbackup” # Organization name for reports
mailto “[email protected]” # Email address to receive reports
netusage 10000 Kbps # Bandwidth limit, 10M
dumpcycle 1 week # Backup cycle is 7 days
runspercycle 7 # Run 7 times every 7 days
tapecycle 16 tapes # Dump to 16 different tapes during the cycle
tpchanger “chg-disk” # The tape-changer glue scriptchangerfile “/etc/amanda/totalbackup/changer” # The tape-changer file
tapedev “file://backup/totalbackup/slots” # The no-rewind tape device to be used
tapetype HARDDISK # Define the type of tapeinfofile “/etc/amanda/totalbackup/curinfo” # Database directory
logdir “/etc/amanda/totalbackup/logs” # Log directory
indexdir “/etc/amanda/totalbackup/index” # Index directory#To specify the size of the virtual tapes
define tapetype HARDDISK { # Define our tape behaviour
length 100000 mbytes # Every tape is 100GB in size
}amrecover_changer “changer” # Changer for amrecover
define dumptype global { # The global dump definition
maxdumps 2 # The maximum number of backups run in parallel
estimate calcsize # Estimate the backup size before dump
holdingdisk yes # Dump to temp disk (holdingdisk) before backup to tape
auth “bsdtcp” # to enable “BSDTCP” authentication.
index yes # Generate index. For restoration usage
}define dumptype root-tar { # How to dump root’s directory
global # Include global (as above)
program “GNUTAR” # Program name for compress
comment “root partitions dumped with tar”
compress none # No compress
index # Index this dump
priority low # Priority level
}define dumptype user-tar { # How to dump user’s directory
root-tar # Include root-tar (as above)
comment “user partitions dumped with tar”
priority medium # Priority level
}define dumptype comp-user-tar { # How to dump & compress user’s directory
user-tar # Include user-tar (as above)
compress client fast # Compress in client side with less CPU (fast)
}
3. Configuring Backup Location
Create a cache directory to use as a holding disk
mkdir -p /dumps/amanda
chown amandabackup:disk /dumps/amanda
chmod 750 /dumps/amanda
Create a directory to store backups
mkdir -p /backup/totalbackup/
chown amandabackup:disk /backup/totalbackup/
chmod 750 /backup/totalbackup/
As the amandabackup user:
su amandabackup
$touch /etc/amanda/totalbackup/tapelist
$mkdir -p /backup/totalbackup/slots
$cd /backup/totalbackup/slots
To create virtual tapes, where the backup files will be stored. Here I will create 16 tape cycles as we mentioned in amanda.conf file
$for ((i=1; $i<=16; i++)); do mkdir slot$i;done
$ln -s slot1 data
The virtual tapes now need to be labeled
$for n in `seq 1 16` ; do amlabel totalbackup totalbackup-${n} slot ${n}; done
Reading label…
Found an empty tape.
Writing label ‘totalbackup-1’…
Checking label…
Success!
Reading label…
Found an empty tape.
Writing label ‘totalbackup-2’…
Checking label…
Success!
Reading label…
Found an empty tape.
Writing label ‘totalbackup-3’…
Checking label…
Success!
Reading label…***********************
Create required directories defined in config
$mkdir /etc/amanda/totalbackup/curinfo
$mkdir /etc/amanda/totalbackup/logs
$mkdir /etc/amanda/totalbackup/index
Check the status of virtual tape
$amdevcheck totalbackup file:/backup/totalbackup/slots status
SUCCESS
We need to reset the virtual tape changer back to the first slot
$amtape totalbackup reset
changer is reset
B. Configuring Service
Login as amandabackup
$su – amandabackup
Create disklist file, which is a file containing the directories to be backed up and the dumptype
$vim /etc/amanda/totalbackup/disklist
www.example.com /var/www/vhosts root-tar
FYI: hostname must be in FQDN, add the host entry into /etc/hosts
root-tar means the dump type
/var/www/vhosts directory for backup
Exit from amandabackup user and login to root user
#vim /etc/hosts
192.168.1.2 www.example.com
C. Install Amanda Backup System Client
Login to client server and install amanda client
#wget http://www.zmanda.com/downloads/community/Amanda/3.3.3/Redhat_Enterprise_6.0/amanda-backup_client-3.3.3-1.rhel6.x86_64.rpm
As amandabackup user create file /var/lib/amanda/.amandahosts which defines the where is amanda backup server
$su – amandabackup
$vim /var/lib/amanda/.amandahosts
www.server.com amandabackup amdump
Return to root user
Add this hostname in /etc/hosts and can be reslove to an IP
#vim /etc/hosts
192.168.1.3 www.server.com
Enable amanda service in xinetd:
#vim /etc/xinetd.d/amanda
disable = no#chkconfig xinetd on
#service xinetd restart
Make sure the service is running or not
#netstat -a | grep amanda
udp 0 0 *:amanda *:*
D. Perform the process
Now return to amanda backup server and login as amandabackup
#su – amandabackup
$amcheck totalbackup
Client check: 1 host checked in 2.070 seconds. 0 problems found.
Common error occurs in checking the client host.
1. WARNING: www.example.com: selfcheck request failed: No route to host
Ensure that if you give client IP in /etc/hosts or check with client firewall settings
2. ERROR: NAK www.example.com: user amandabackup from 192.168.1.3 is not allowed to execute the service noop: Please add the line “192.168.1.3 amandabackup amdump” to /var/lib/amanda/.amandahosts on the client
Add “192.168.1.3 amandabackup amdump” in client /var/lib/amanda/.amandahosts file
3. can not stat /var/amanda/amandates: No such file or directory
Create a file in client directory in amandabackup user
E. Run a Backup
$amdump totalbackup
Run the tool amadmin with a find argument for a quick summary of what has been backed up
$amadmin totalbackup find
date host disk lv tape or file file part status
2013-06-2517:38:09 www.example.com /var/www/vhosts 0 totalbackup-1 1 1/1 OK
We can automate this process using cronjob. Run following command as amandabackup user:
$crontab -e
15 1 * * * /usr/sbin/amdump totalbackup
As root user, reload the crond service to activate this job:
#service crond reload
F. Recovery
As amandabackup user
$vim /etc/amanda/amanda-client.conf
conf “totalbackup” # your config name
index_server “www.server.com” # your amindexd server
tape_server “www.server.com” # your amidxtaped serverauth “bsdtcp”
ssh_keys “” # your ssh keys file if you use ssh auth
Add the line “www.example.com root amindexd amidxtaped” to /var/lib/amanda/.amandahosts on the server
As root run “amrecover” to initiate the data recovery process.
Connect to Amanda server using following command
#amrecover
AMRECOVER Version 3.3.0. Contacting server on www.server.com …
220 localhost AMANDA index server (3.3.3) ready.
Setting restore date to today (2013-06-25)
200 Working date set to 2013-06-25.
200 Config set to totalbackup.
501 Host localhost.localdomain is not in your disklist.
Trying host localhost.localdomain …
501 Host localhost.localdomain is not in your disklist.
Trying host localhost …
501 Host localhost is not in your disklist.
Trying host localhost.localdomain …
501 Host localhost.localdomain is not in your disklist.
Use the sethost command to choose a host to recover
Lets list the host in Amanda Backup System server
amrecover>listhost
00- List hosts for config totalbackup
201- www.example.com
200 List hosts for config totalbackupamrecover>sethost www.example.com
200 Dump host set to www.example.com.
Lets list the disk for this host in Amanda backup server
amrecover> listdisk
200- List of disk for host www.example.com
201- /var/www/vhosts
200 List of disk for host www.example.comamrecover> setdisk /var/www/vhosts
200 Disk set to /var/www/vhosts/
history command to list out to find which is the latest backup
amrecover> history
200- Dump history for config “totalbackup” host “www.example.com” disk /var/www/vhosts/
201- 2013-03-26-17-53-14 1 totalbackup-2:1
201- 2013-03-25-17-38-09 0 totalbackup-1:1
200 Dump history for config “totalbackup” host “www.example.com” disk /var/www/vhosts/
Choose the backup on latest backup :
amrecover> setdate 2013-03-26-17-38-09
200 Working date set to 2013-03-26-17-38-09.
list out all the files in this backup directory as below:
amrecover> ls
2013-03-26-17-38-09 index.html
2013-03-26-17-38-09 upload.php
2013-03-26-17-38-09 phpcompat.php
2013-03-26-17-38-09 io.php
2013-03-26-17-38-09 phpcompat.php
Since I need only io.php file so I add that file only for extraction
amrecover> add io.php
Added file io.php
Once added, we can extract the backup to the working directory
amrecover> extract
Extracting files using tape drive changer on host www.server.com.
The following tapes are needed: totalbackup-1Extracting files using tape drive changer on host www.server.com.
Load tape totalbackup-1 now
Continue [?/Y/n/s/d]?Restoring files into directory /root/res
All existing files in /root/res can be deleted
Continue [?/Y/n]?.io.php
amrecover> exit
200 Good bye.
It will then restore all your files into the working directory. Just exit the amrecover console and you can see the restored directory will be exist there
#ls
-rw-r–r–. 1 root root 1212 Jun 22 2012 io.php
Restoration completed