What is Puppet ?
======================
Introduction to Puppet ,a software which is using for system automation and management. It manages your servers, your described machine configurations in an easy-to-read declarative language, and will bring your systems into the desired state and keep them there.Before talking more about puppet I want to refresh your thoughts about automation. The product is owned by puppet labs Inc the leader in IT automation .
What is Automation ?
======================
System automation is the use or introduction of automatic configurations , scripts or other process to perform the daily task automatically.
Why Automation ?
======================
Speed : It will help us to complete the tasks in less time
consistency : It will avoid human errors which may occur during the repetition
Easy : Free from hazards and avoid boredom of repetition
What to Automate ?
======================
Since the servers a infrastructure consist of a certain complexity and valuable data it will not be a wise decision if we choose a wrong thing to automate. So we have to consider few things before start with automation.
Choose the right thing to automate
Frequency : How often we have to perform the task. If the task comes very rare the effort to make those thing automated will be a waist.
Variability : How much similar the tasks are, more similar more easy to automate
Don’t Learn two things at a time : If we try to automate a technology or process in which we are not sounded enough. It will be very difficult to isolate the errors when things go wrong.That means we cant identify the exact issue, whether the issue is with the process we are doing or its with the puppet configurations.
Platform Support
======================
With Introduction to Puppet will work on all operating systems but the puppet master should be in linux . Windows machines can’t act as puppet master servers. Before installing any Windows agent nodes, be sure that you have a *nix puppet master installed and configured.
How Puppet Works ?
========================
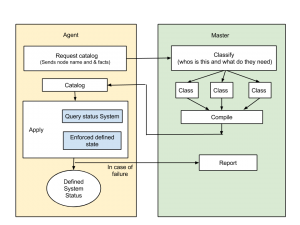
Puppet have a client part and a server part the client part is known as puppet agent and the server part is known as puppet master. The all major configuration is done at the Introduction to Puppet master. The puppet agent only holds the information of its puppet master.
Defining or changing a state of a system using puppet is done through four states or steps.
- Compile
- Transport
- Instantiate
- Configure
Compile
In this phase it compiles the manifests which written in puppet language it is more like a syntax rather than a language.The output will be normal objects and the compiling process is done at the server.
Transport
As the name represents in this phase the transporting jobs are done . The outputs from the compile state (normal objects) are transported to the puppet clients and the status update from agent to master is transferred after the execution.
Instantiate
From this phase the process are taking place at agent side.During this phase the normal objects are converted to puppet objects.
Configuration
In this phase the Introduction to Puppet objects are applied to the system and the system will get configured to the desirable state.
Puppet Installation
======================
Puppet software is opensource and is released under the Apache 2.0 license .Puppet software version prior to 2.7.0 was distributed under GPL v2.0 . It is both available as Puppet free edition which is absolutely free and Puppet Enterprise edition comes with their official support and additional functionality.
The puppet files are available at Internet you can simply install it using yum by the help of Puppet repo or EPEL repo otherwise you can compile it by downloading the source file from the official site of Puppet Labs.
Prerequisites
======================
Factor
Facter is an independent, cross-platform Ruby library designed to gather information on all the nodes you will be managing with Puppet. It is available on all platforms that Introduction to Puppet is available. Basically factor is a lightweight program that gathers basic node information about the hardware and operating system. Facter is especially useful for retrieving things like operating system names, hardware characteristics, IP addresses, MAC addresses, and SSH keys.
Hiera
Hiera is a key/value lookup tool for configuration data, built to make Puppet better and let you set node-specific data without repeating yourself.
Add Puppet Labs repo to your repo list
===========================================
You have to add puppet repo to your server
# rpm -ivh http://yum.puppetlabs.com/el/6/products/i386/puppetlabs-release-6-6.noarch.rpm
Puppet Server Installation
===========================================
# yum install puppet-server
# yum install ruby-rdoc
Please verify that following packages are getting installed
# service puppetmaster start
# chkconfig puppetmaster on
Check whether the puppet master is running in all required levels
Puppet Client Installation
===========================================
# yum install puppet ruby-rdoc
# service puppet start
# chkconfig puppet on
Check whether the puppet agent is running in all required levels
Puppet Configurations
===========================================
Puppet Master Configurations
Important files and file locations in Puppet Master
/etc/puppet/fileserver.conf
/etc/puppet/auth.conf
/etc/puppet/puppet.conf
/etc/puppet/files
Configuring the files
/etc/puppet/puppet.conf
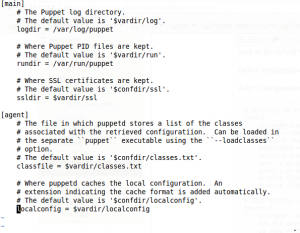
Puppet uses four primary config sections:
main :is the global section used by all commands and services. It can be overridden by the other sections.
master: is used by the puppet master service and the puppet cert command.
agent :is used by the puppet agent service.
user : is used by the puppet apply command, as well as many of the less common Puppet sub commands.
Puppet will prefer to use settings from one of the three application-specific sections (master, agent, or user). If it doesn’t find a setting in the application section, it will use the value from main. (If main doesn’t set one, it will fall back to the default value.)
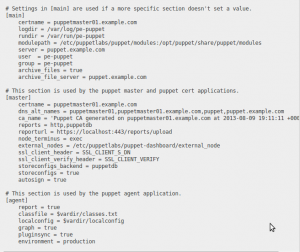
A fresh /etc/puppet/puppet.conf will look like this you have to edit it according to you needs.
A snapshot of configured /etc/puppet/puppet.conf
/etc/puppet/auth.conf
Puppet master and puppet agent communicate with each other over a pseudo-RESTful HTTP network API. By default, the usage of this API is limited to the standard types of master/agent communications. However, it can be exposed to other processes and used to build advanced tools on top of Puppet’s existing infrastructure and functionality. (HTTP API calls are formatted as https://{server}:{port}/{environment}/{resource}/{key}.)
As you might guess, this can be turned into a security hazard, so access to the HTTP API is strictly controlled by a special configuration file.
ACL format
Each auth.conf ACL is formatted as follows:
path [~] {/path/to/resource|regex}
[environment {list of environments}]
[method {list of methods}]
[auth[enthicated] {yes|no|on|off|any}]
[allow {hostname|certname|*}]
Whether the ACL matches authenticated requests.
auth yes (or on) means this ACL will only match requests authenticated with an agent certificate.auth any means this ACL will match both authenticated and unauthenticated requests. auth no (or off) means this ACL will only match requests that are not authenticated with an agent certificate. Authenticated requests (like from puppet agent) will skip this ACL.
Most communications between puppet agent and the puppet master are authenticated, so you will usually be using auth yes.The value of auth must be one of the above options; it cannot be a list. If auth isn’t explicitly specified, it will default to yes.
With the Introduction to Puppet appends a list of default ACLs to the ACLs read from auth.conf. However, if any custom ACLs have a path identical to that of a default ACL, that default ACL will be omitted when composing the full list of ACLs.
/etc/puppet/fileserver.conf
This configuration file help us to create a file server in puppet by the help of which we can transfer static files into puppet agents. It will be very useful if you are planning to push same configuration files to multiple nodes. You can set up a file directory and set acl for them by editing these line in the /etc/puppet/fileserver.conf . Here I am allowing everybody so I gave * in the permission part.
NOTE : After setting up the file directory we have to specify this file directory as source in the manifest file.
/etc/puppet/manifests
The manifest directory conatians puppet programs with .pp extension in which the actions are defined. Its more like a syntax rather than a language . The default manifest is name as “site .pp” we can include other manifests inside that otherwise it only performs the action defined in site.pp.You have to write your own manifests according to your needs I am attaching few manifests and its contest below
- To install Apache and run the httpd service:
class apache {
package { httpd: ensure => installed }
service { “httpd”:
ensure => running,
require => Package[“httpd”],
}
}
- To stop the mdmdp service:
class redhat {
service {
“mdmdp”:
enable => true,
ensure => stopped,
}
}
- To execute commands:
class start_vhost {
$noop = true
exec { “/usr/sbin/start_ws”: }
exec { “/usr/sbin/start_vhost”: }
}
- To start a service as per the remote operating system:
class httpd_service_start {
case $operatingsystem {
redhat: { service { “httpd”: ensure => running }}
debian: { service { “apache”: ensure => running }}
default: { service { “apache2″: ensure => running }}
}
}
- To create a user:
class virt_users {
@user { “jsmith”:
ensure => “present”,
uid => “507”,
gid => “507”,
comment => “John Smith”,
home => “/nfs/HR/home/jsmith”,
shell => “/bin/bash”,
}
}
- To manage Cron job:
class set_cron_syscheck {
cron { “syscheck”:
command => “/usr/bin/syscheck”,
user => “root”,
hour => “18”,
minute => “0”
}
}
- Transferring a file from the Puppet server:
class httpd_conf {
file { “httpd.conf”:
source => “puppet://puppetmaster/httpd/conf/httpd.conf”
}
}
Puppet Agent registration with Puppet Master
=======================================
On Client
puppet agent –test –waitforcert=60 –server=$puppetmaster’s hostname/IP
The above command will create your aggent certificate and sent a the certificates to master for signing.
On Server
puppet cert list
This command will list all certificates waiting for approval .You can see agent certificate with its domain name as below.
You can sign the certificate by this command
puppet cert sign puppetclient.com
Now the Signing is completed. Now the puppet server will update the changes to the clients according to your manifests.
reference :wikipedia


